
$693.56
Add to Cart
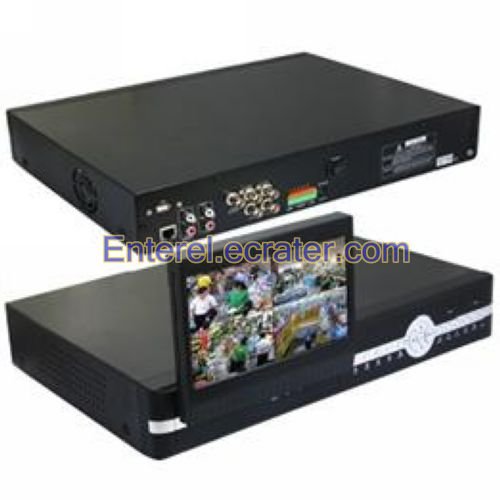
4 Channels H.264 Triplex USB HDD DVR D8204


More than 10 available
Details
Shipping: Australia: free (more destinations)
Condition: Brand new
*The store has not been updated recently. You may want to contact the merchant to confirm the availability of the product.
Specifications:
* Video Compression: H.264
* Video System: NTSC / PAL
* Operation System: RTOS
* Video Input / Output: BNC 4-channel inputs / 1-channel output
* Audio Input / Output: RCA 4-channel inputs / 1-channel output
* Display Frame Rate: NTSC: 120 fps / PAL: 100 fps
* Recording Frame Rate: NTSC: 120 fps(CIF), 60fps(2CIF) PAL: 100fps(CIF), 50fps(2CIF)
* Display Resolution: NTSC: 720 x 480 / PAL: 720 x 576
* Record Resolution: NTSC: 720 x 240, 360 x 240; PAL: 720 x 288, 360 x 288
* Record Mode: Always / schedule / motion detection / sensor triggered
* Display Mode: Each, Quad, Auto-switch, Digital Zoom, PIP
* HDD Interface: SATA, one fixed HDD rack supports up to 500GB HDD
* Playback Search: Time & Date, Event List
* USB: USB2.0, 1 USB mouse, 1 USB thumb drive backup to AVI file
* PTZ: Built-in RS-485 port, support PELCO-P & PELCO-D
* Network: RJ45, TCP/IP, DDNS, IE based control DVR (monitor, operate, playback, backup)
* Sensor & Alarm: 4-channel inputs / 1-channel output
* Monitor: 7 inch LCD 16:9 monitor
* Remote Control: Included
* Power Supply: DC12V, 5A (adaptor included)
Features:
* H.264 real-time compression & network transmission
* Built-in 7 inch LCD 16:9 monitor, one button to display or hide
* Triplex operating system
* Full graphics OSD interface
* Support to operate the DVR with USB mouse
* Audio recording available
* Programmable schedule, motion detection & sensor triggered recording
* Motion detection: settable area & sensitivity
* Support half D1 recording resolution
* Motion trace function
* User-defined camera title
* Configurable record picture quality & frame rate
* Display modes: digital zoom & PIP
* Network, IE based monitor, playback, recording
* Support PTZ control (Pelco-P / Pelco-D) via built-in RS-485 port
* Support system log function
* Password protection
* Built-in USB2.0 port for video backup to USB Thumb drive
* Self-recovery after power reconnected
* Optional VGA video output
How to Replace a DVR Hard Drive:
* Disconnect your DVR by unplugging any cables connected to it, including the power cable. Remove the screws located on the back of the unit that hold the top cover in place. There are usually two to six of these screws, depending on the model of DVR. Lay these screws in a safe place where they won't get lost, and slide the cover off
* Locate the hard drive. This is a rectangular metal unit that measures 3 1/2 inches wide. It is usually located away from the other hardware, often in its own bracket. There will be two to four screws holding it in place. Remove these, disconnect the cables connected to the drive, and slide it out of the system
* Check the label of the drive to see if it is IDE or SATA. It will say which one of the two interfaces it uses. Any replacement desktop hard drive of the same interface type will work in your DVR. Avoid using a laptop drive, because they won't fit and aren't designed for the high-stress environment of video streaming
* Place the new drive into the brackets, and replace the screws that were removed from the old one. Plug the data and power cables into this drive. They will insert the same way they came out of the old one. Once the drive has been installed, put the cover back on the DVR unit, and replace the screws. Hook the DVR back up to the television, and it will be ready to record
How to Copy From a DVR to an External Hard Drive:
* Install video software on your computer. To properly process your data transfer, you need video software, which you can get from computer and electronics retailers or online. Simple, easy-to-use programs can be downloaded for free. Use reputable sites, such as CNET.com, to find some of the more reputable free programs. More advanced programs, with sophisticated editing capabilities, will usually only be available for purchase
* Connect your computer and DVR. In order to copy programs to your external hard drive, you need to transfer them to your computer. For older systems, and especially for desktop computers, you will need to use use RCA connectors to connect the DVR to the computer. RCA connectors are color-coordinated audio-visual cables used to connect electronics components, such as stereos and receivers, and they can be used with some computers and DVRs as well. Plug the yellow ends of the cable into the video jacks on the machines, then plug the red and white ends into the audio jacks. If you have a newer system, use USB cables to connect the computer and DVR. With a TiVo DVR and a wireless home network, you can connect your components wirelessly if you download proprietary TiVo software
* Transfer the program to your computer. Choose the program you wish to transfer from your DVR then press "Play" while pressing "Record" on your computer software program. The program should transfer in real-time. Monitor the recording and, when finished, check for quality
* Copy the program to your external hard drive. Using the video software on your computer, select your external drive as the destination for your next copy. Select the copy you just made from the DVR and make another copy on your external hard drive. Again, monitor the transfer and check for quality when you are finished
Package Included:
* 1 x 4-Channel H.264 Triplex Digital Video Recorder with 7 inch Built-in LCD Monitor
* Video Compression: H.264
* Video System: NTSC / PAL
* Operation System: RTOS
* Video Input / Output: BNC 4-channel inputs / 1-channel output
* Audio Input / Output: RCA 4-channel inputs / 1-channel output
* Display Frame Rate: NTSC: 120 fps / PAL: 100 fps
* Recording Frame Rate: NTSC: 120 fps(CIF), 60fps(2CIF) PAL: 100fps(CIF), 50fps(2CIF)
* Display Resolution: NTSC: 720 x 480 / PAL: 720 x 576
* Record Resolution: NTSC: 720 x 240, 360 x 240; PAL: 720 x 288, 360 x 288
* Record Mode: Always / schedule / motion detection / sensor triggered
* Display Mode: Each, Quad, Auto-switch, Digital Zoom, PIP
* HDD Interface: SATA, one fixed HDD rack supports up to 500GB HDD
* Playback Search: Time & Date, Event List
* USB: USB2.0, 1 USB mouse, 1 USB thumb drive backup to AVI file
* PTZ: Built-in RS-485 port, support PELCO-P & PELCO-D
* Network: RJ45, TCP/IP, DDNS, IE based control DVR (monitor, operate, playback, backup)
* Sensor & Alarm: 4-channel inputs / 1-channel output
* Monitor: 7 inch LCD 16:9 monitor
* Remote Control: Included
* Power Supply: DC12V, 5A (adaptor included)
Features:
* H.264 real-time compression & network transmission
* Built-in 7 inch LCD 16:9 monitor, one button to display or hide
* Triplex operating system
* Full graphics OSD interface
* Support to operate the DVR with USB mouse
* Audio recording available
* Programmable schedule, motion detection & sensor triggered recording
* Motion detection: settable area & sensitivity
* Support half D1 recording resolution
* Motion trace function
* User-defined camera title
* Configurable record picture quality & frame rate
* Display modes: digital zoom & PIP
* Network, IE based monitor, playback, recording
* Support PTZ control (Pelco-P / Pelco-D) via built-in RS-485 port
* Support system log function
* Password protection
* Built-in USB2.0 port for video backup to USB Thumb drive
* Self-recovery after power reconnected
* Optional VGA video output
How to Replace a DVR Hard Drive:
* Disconnect your DVR by unplugging any cables connected to it, including the power cable. Remove the screws located on the back of the unit that hold the top cover in place. There are usually two to six of these screws, depending on the model of DVR. Lay these screws in a safe place where they won't get lost, and slide the cover off
* Locate the hard drive. This is a rectangular metal unit that measures 3 1/2 inches wide. It is usually located away from the other hardware, often in its own bracket. There will be two to four screws holding it in place. Remove these, disconnect the cables connected to the drive, and slide it out of the system
* Check the label of the drive to see if it is IDE or SATA. It will say which one of the two interfaces it uses. Any replacement desktop hard drive of the same interface type will work in your DVR. Avoid using a laptop drive, because they won't fit and aren't designed for the high-stress environment of video streaming
* Place the new drive into the brackets, and replace the screws that were removed from the old one. Plug the data and power cables into this drive. They will insert the same way they came out of the old one. Once the drive has been installed, put the cover back on the DVR unit, and replace the screws. Hook the DVR back up to the television, and it will be ready to record
How to Copy From a DVR to an External Hard Drive:
* Install video software on your computer. To properly process your data transfer, you need video software, which you can get from computer and electronics retailers or online. Simple, easy-to-use programs can be downloaded for free. Use reputable sites, such as CNET.com, to find some of the more reputable free programs. More advanced programs, with sophisticated editing capabilities, will usually only be available for purchase
* Connect your computer and DVR. In order to copy programs to your external hard drive, you need to transfer them to your computer. For older systems, and especially for desktop computers, you will need to use use RCA connectors to connect the DVR to the computer. RCA connectors are color-coordinated audio-visual cables used to connect electronics components, such as stereos and receivers, and they can be used with some computers and DVRs as well. Plug the yellow ends of the cable into the video jacks on the machines, then plug the red and white ends into the audio jacks. If you have a newer system, use USB cables to connect the computer and DVR. With a TiVo DVR and a wireless home network, you can connect your components wirelessly if you download proprietary TiVo software
* Transfer the program to your computer. Choose the program you wish to transfer from your DVR then press "Play" while pressing "Record" on your computer software program. The program should transfer in real-time. Monitor the recording and, when finished, check for quality
* Copy the program to your external hard drive. Using the video software on your computer, select your external drive as the destination for your next copy. Select the copy you just made from the DVR and make another copy on your external hard drive. Again, monitor the transfer and check for quality when you are finished
Package Included:
* 1 x 4-Channel H.264 Triplex Digital Video Recorder with 7 inch Built-in LCD Monitor
You may also be interested in:
-
$5.56
-
$16.73

-
$13.94
-
$85.83
-
$319.25

-
$136.61

-
$130.82

-
$1.49
-
$4.49
-
$6.00


 CN, Guangdong
